I expect the virtual switch and the global zone configuration steps already being solved at this point of time. See below:
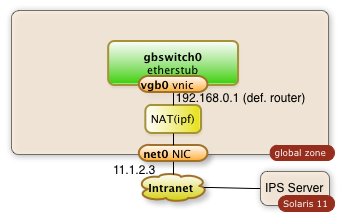
This means that a virtual switch with the name gbswitch0 already exists.
A bit of planning is required in order to have all data for configure the zone. The following information is needed. The names which I'm going to use in my commands are already entered:
| Information | optional | Value |
|---|---|---|
| zone name | mandatory | zone1 |
| zones home directory | mandatory | /zones |
| zone virtual network interface | mandatory | vnz1 |
| ip address in private network | mandatory | 192.168.0.2 |
| default router for private network | mandatory | 192.168.0.1 |
| IP address of DNS server | optional | |
| root password | mandatory | |
| user name, full user name, user password | optional | |
| time zone information | optional |
1. Create a Virtual Network Interface for the Zones
The zone will have one interface. The interface will be virtual network interface vnz1 which will be attached to the virtual switch gbswitch0 The following commands will have to be executed in the global zone:
dladm create-vnic -l gbswitch0 vnz1
2. Declare the Zone
The commands below will configure a zone with the name zone1 and a network interface vnz1
$ zonecfg -z zone1 "create; set zonepath=/zones/zone1;set ip-type=exclusive; commit"
$ zoneadm -z zone1 install
$ zonecfg -z zone1 "add net; set physical=vnz1;end"
3. Boot and Configure the Zone
The zone is now ready to be booted:
zoneadm -z zone1 boot
The zone is now running. The network configuration isn't complete and it takes a login through the zones console with a sys-config dialog. Enter
$ zlogin -C zone1
This will lead you into a sysconfig dialog. Choose a manual network configuration and provide the remaining information from the table above and configure the IP address and the default router. The configuration of name services and NIS is optional.
The zone should be ready for usage after these steps.
The zone is
- ready for additional software installation
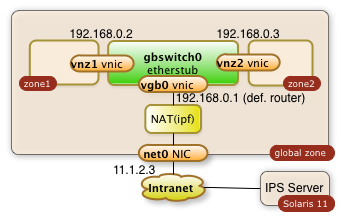
- the zone can reach any other zone in the private virtual network
- the zone can reach out to the intranet when needed through the NAT services of the global zone
The zone is otherwise private for the outside intranet.
Repeat the same steps for a second zone and you end up with a private virtual network with multiple zones.
4. Scripts
4.1 Zone Configuration and installation
#!/bin/bashMySwitch=gbswitch0
MyZoneNic=vnz1
MyZone=zone1
MyZoneIp=192.168.0.2
MyRootZoneIp=192.168.0.1echo "** create VNIC $MyZoneNic in global zone"
# Configure and install the zone zonecfg -z $MyZone "create; set zonepath=/zones/$MyZone;set ip-type=exclusive; com
dladm create-vnic -l $MySwitch $MyZoneNic
echo "** starting creation of zone: $MyZone"
mit"
zoneadm -z $MyZone verify
zoneadm -z $MyZone install
zonecfg -z $MyZone "add net; set physical=$MyZoneNic;end"
echo "** Booting zone $MyZone "
zoneadm -z $MyZone boot
echo "** sleep for 30 seconds and hope for the zone to come for post config "
sleep 30
zoneadm list -v
Kick off the sys-config by logging into the zlogin
$ zlogin -C zone1
4.2 Deletion of the Zone
This script is a kind of brutal. It wipes out the entire zone...
#!/bin/bashMyZoneNic=vnz1
MyZoneIp=192.168.0.2
MyZone=zone1zoneadm list -v
zoneadm -z $MyZone halt
zoneadm -z $MyZone uninstall -F
zonecfg -z $MyZone delete -F
zoneadm list -v
dladm show-vnic
dladm delete-vnic $MyZoneNic
dladm show-vnic
- Printer-friendly version
- Log in to post comments
- 4721 views