Disclaimer: All commands executed need root privileges and they make major changes to your system. Have a backup or a boot environment before you start experimenting.
1. Create a virtual Switch
The command:
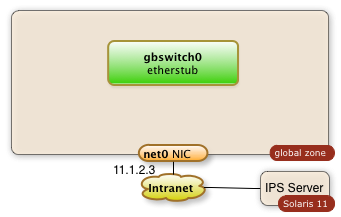
$ dladm create-etherstub gbswitch0
Will create an internal virtual switch as shown in the diagram below:
You can control the success of this operation with the command
$ dladm show-etherstub
LINK
gbswitch0
The swith can de deleted with the command
$ dladm delete-etherstub gbswitch0
This virtual switch will be needed to operate our internal network.
2. Create a virtual Network Interface which connects the global Zone to the virtual Switch
The sequence of commands below will create a virtual network interface for the switch.
The idea is to operate an internal network in the IP range 192.168.0.0.
The name of the virtual network interface is vgb0. The IP address is 192.168.0.1
$ dladm create-vnic -l gbswitch0 vgb0
$ ipadm create-ip vgb0
$ ipadm create-addr -T static -a 192.168.0.1/24 vgb0/addr0
This result will be a Solaris global zone with a second network interface which isn't visible to the outside (the intranet):

The successful creation of a vnic (virtual network address) can be checked with the following command.
$ dladm show-vnic
LINK                OVER         SPEED  MACADDRESS        MACADDRTYPE       VID
vgb0                gbswitch0    40000  2:8:20:51:c8:5f   random            0
and
$ ipadm show-addr vgb0
ADDROBJ           TYPE     STATE        ADDR
vgb0/addr0        static   ok           192.168.0.1/24
You may need to delete the vnic. This can be achieved through the command:
$ dladm delete-vnic vgb0
3. Enable the IP Forwarding
I assume that the current system has a public network interface with the name net0. I assumeas well that this is the only network interface. IP-forwarding is most likely disabled in this case. It needs to be enabled. The following command enables the IP forwarding through the interfaces net0 and vgb0:
$ ipadm set-ifprop -p forwarding=on -m ipv4 net0
$ ipadm set-ifprop -p forwarding=on -m ipv4 vgb0
The IP-forwarding can be disable after the private virtual network isn't needed anymore. This happens with the following commands:
$ ipadm set-ifprop -p forwarding=on -m ipv4 net0
$ ipadm set-ifprop -p forwarding=on -m ipv4 vgb0
4. Enable the Network Address Translation
The zones which will work through the private virtual network will find their way out of the system as well without NAT. The problem arises for IP packets on their back. Systems outside of the PVN will not know about this sub-net and they will not have routes to communicate back. The public interface of the global zone has to act as a proxy and it will have to know how to relay packets back. This is being done by the ipfilter service which is disabled by default.
The Network Address Translation is a service which needs to be configured first by creating the file /etc/ipf/ipnat.conf. The commands below enable the network address translation for the internal network 192.168.0.0.
$ echo "map $MyPublicNic 192.168.0.0/24 -> 0/32  portmap tcp/udp auto" > /etc/ipf/ipnat.conf
$ echo "map $MyPublicNic 192.168.0.0/24 -> 0/32" >> /etc/ipf/ipnat.conf
The last step is to start the ipfilter service
$ svcadm enable network/ipfilter
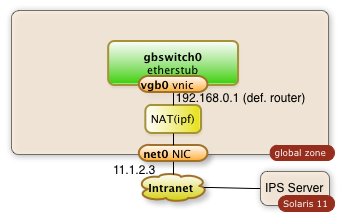
The diagram below demonstrates the configured components:
There are chances that you will have to stop the ipfilter service one day. The service can be stopped with this command:
$ svcadm disable network/ipfilter
5. Scripts
Enjoy the two scripts. Use them with caution.
5.1 Preparation of the global Zone
Change the variables at the beginning as needed.
The script will not check if certain files already exist nor if required services are already running and network objects already exist!
#!/bin/bashMySwitch=gbswitch0
MyRootZoneNic=vgb0
MyRootZoneIp=192.168.0.1
MyInternalNet=192.168.0.0
MyPublicNic=net0echo "** create a switch with name $MySwitch "
dladm create-etherstub $MySwitch
echo "*  create a vnic with name $MyRootZoneNic "
dladm create-vnic -l $MySwitch $MyRootZoneNic
echo "*  create ip for $MyRootZoneNic"
ipadm create-ip $MyRootZoneNic
echo "*  create ip addr $MyRootZoneIp for $MyRootZoneNic"
ipadm create-addr -T static -a $MyRootZoneIp/24 $MyRootZoneNic/addr0
#echo "* enable ipv4 forwarding in root zone "
#routeadm -u -e ipv4-forwarding
echo "*  Status check network plumbing:"
dladm show-vnic
echo "** create NAT configuration with ipf, enable forwarding"
ipadm set-ifprop -p forwarding=on -m ipv4 $MyPublicNic
ipadm set-ifprop -p forwarding=on -m ipv4 $MyRootZoneNic
cp /etc/ipf/ipnat.conf /etc/ipf/ipnat.conf.orig
echo "map $MyPublicNic $MyInternalNet/24 -> 0/32  portmap tcp/udp auto" > /etc/ipf/ipnat.conf
echo "map $MyPublicNic $MyInternalNet/24 -> 0/32" >> /etc/ipf/ipnat.conf
svcadm enable network/ipfilter
5.2 Cleanup, undo, deletion
This script will swipe out the configuration which has been configured. It's simple and brutal...
#!/bin/bashMySwitch=gbswitch0
MyRootZoneNic=vgb0
MyRootZoneIp=192.168.0.1
MyPublicNic=net0echo "* disable ipv4 forwarding in root zone"
routeadm -u -d ipv4-forwarding
echo "*   delete addr: $MyRootZoneNic"
ipadm delete-addr $MyRootZoneNic/addr0
ipadm delete-ip $MyRootZoneNic
echo "*   delete vnic: $MyRootZoneNic"
dladm show-vnic
dladm delete-vnic $MyRootZoneNic
dladm show-vnic
echo "*  delete a switch with name $MySwitch "
dladm show-etherstub
dladm delete-etherstub $MySwitch
dladm show-etherstub
echo "** delete NAT configuration with ipf"
ipadm set-ifprop -p forwarding=off -m ipv4 $MyPublicNic
ipadm set-ifprop -p forwarding=off -m ipv4 $MyRootZoneNic
svcadm disable network/ipfilter
- Printer-friendly version
- Log in to post comments
- 5690 views