SUSE SLES related Topics
SUSE SLES related TopicsA number of tidbits needed when working with SUSE SLES.
Disclaimer:
- Please be careful applying them.
- They all need elevated privileges.
- They may lower the security of your system.
- They may render your system unusable.
Consult the appropriate documentation before you apply them and understand the implications.
Other interesting topics
- Changing Instance Types In AWS For SLES 12 SP2 And SLES 12 SP3 Based HVM Instances
- SUSE systems without Internet access
- 5081 views
yast bug in SLES for SAP 12 SP1 with AWS Elastic File System (EFS)
yast bug in SLES for SAP 12 SP1 with AWS Elastic File System (EFS)There is a bug in the SLE command line installation tool yast which may effect SAP customers using SLES for SAP 12 SP1 (suse-sles-sap-12-sp1-byos-v20160308-hvm-ssd-x86_64, ami-4a8fb520) on AWS in conjunction with the Elastic File System (EFS).
The Architecture
A customer uses EFS for shared SAP file systems like /sapmnt or /usr/sap. An AWS system may look before the installation of the SAP software with the command df -k as follows:
nw11:~ # df -k
Filesystem    1K-blocks        Used    Available        Use% Mounted on
/dev/hda1     103078876        3286120 95477452         4% /
devtmpfs      8222944          8       8222936          1% /dev
tmpfs         12347764         0       12347764         0% /dev/shm
tmpfs         8231840          9716    8222124          1% /run
tmpfs         8231840          0       8231840          0% /sys/fs/cgroup
10.79.8.181:/ 9007199254740992 0       9007199254740992 0% /usr/sap/SI1
10.79.8.15:/  9007199254740992 0       9007199254740992 0% /sapmnt/SI1
SLES reports two file systems which have 8 Exabyte free space where as nothing is getting used.
The Bug
I have been calling yast from the command line to install an X11 environment for the upcoming SAP Netweaver installation.
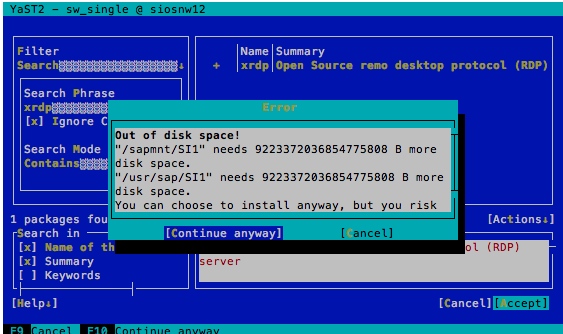
yast seems to be overhelmed by the capacity of 8 Exabyte in these two additional file systems. It seems to have an integer overrun and thinks that there isn't enough disk space. It'll report the following and irrelevant message:

You will want to continue by pushing the button [Continue anyway]. The installation will happen on the root file system and not on the two NFS mounted EFS file systems.
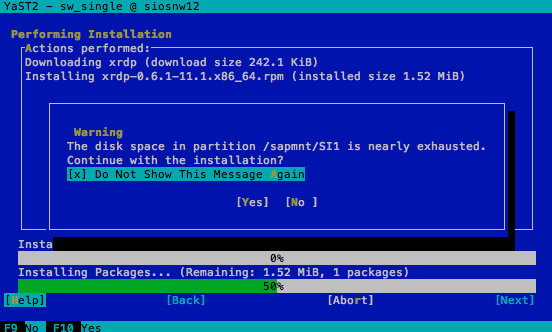
Then yast will come up with the following dialog:

Activate the option Do not Show This Message Again and move on with the option [Yes].
Avoiding the Problem
SUSE is processing this bug as: 991090 (yast sw_single reports "error out of diskspace" while filesystems with 8 ExaByte are mounted)
The problem can been avoided in the mean time through the three following options:
- Install all SLES software through yast before you create the EFS file systems
- Umount the EFS file systems before you use yast.
- Overrule the warning. Move ahead. You will risk a full file system somewhere else
- 3951 views
Add swap space
Add swap spaceDisclaimer: The following commands document how to add a raw device as swap volume. Selecting the wrong raw device will lead to data corruption in file systems!
All commands have to be executed with root privileges
- Create a separate AWS volume with the required space. This warrants that there are no contentions in regards of maximum IOs with other volumes and the solution is price neutral
- I assume that the swap volume is /dev/xvdg, Format and add the volume to swap:
$ mkswap /dev/xvdg
$ swapon /dev/xvdg
Make it persistent through reboots by adding the following line to /etc/fstab
/dev/xvdg swap swap defaults
- 4887 views
Allow User Access without Certificates (Password only)
Allow User Access without Certificates (Password only)AWS systems allow by default access with a certificate only. This is a security measure.
Administrators who decide to lower the security standards by allowing ssh access through user/password credentials on SUSE SLES have to execute the following commands:
- Edit the /etc/ssh/sshd_config file.
- Change the entry "PasswordAuthentication no" to "PasswordAuthentication yes"
- Save the changes
- Restart the sshd daemon with the command
- $ service sshd restart
- 3524 views
Change Hostname on SUSE SLES for SAP Installations on AWS
Change Hostname on SUSE SLES for SAP Installations on AWSSAP systems require hostnames which aren't longer than 13 characters. The default AWS naming schema is to use the IP address separated with dashes to create hostnames. This naming schema can lead to host names with are to long for SAP installations.
The fix is based on the following assumptions:
- The SAP system is being operated in a VPC with it's network interface
- The IP address is a private one.
- No DNS or NIS naming in the clients have to be used
The following procedure renames a system to node1
SLES 11
- Change the content of file /etc/HOSTNAME to node1. This entry will be used to set the host name in future reboots
- Edit the file /etc/cloud/cloud.cfg
- Modify the line preserve_hostname: false to preserve_hostname: true . This entry will be used in the next reboot to determine whether the hostname should be left as it is.
- Edit the file /etc/hosts
- Add node1 to the primary IP address like in this example "10.79.7.92 ip-10-79-7-92 node1"
- Set the host name with the command "# hostname node1". This command performs a dynamic change. It's effect will not last beyond a reboot.
- Configure the DHCP client not to configure the hostname
- Enter the command yast lan
- Move to entry Hostname/DNS (<tab> <arrow right>) and select it
- set hostname to node1 in the host name field
- deselect (remove x) from the entry set hostname dynamically
- Save all settings and leave yast
SLES 12 & SLES 15
- Edit the file /etc/cloud/cloud.cfg
- Modify the line preserve_hostname: false to preserve_hostname: true . This entry will be used in the next reboot to determine whether the hostname should be left as it is.
- Edit the file /etc/hosts
- Add node1 to the primary IP address like in this example "10.79.7.92 ip-10-79-7-92 node1"
- Use command:
-
$ hostnamectl set-hostname node1
-
- 14266 views
Enable root Access for Linux Instances
Enable root Access for Linux InstancesAWS doesn't grant root access by default to EC2 instances. This is an important security best practise. Users are supposed to open a ssh connection using the secure key/pair to login as ec2-user. Users are supposed to use the sudo command as ec2-user to obtain elevated privileges.
Problems arise with a number of software packages which require remote root access for installation and operation. The following cheat sheet explains how to enable root access. It hasn't been tested with all Linux distributions.
Disclaimer: Enabling direct root access to EC2 systems is a bad security practise which AWS doesn't recommend. It creates vulnerabilities especially for systems which are facing the Internet (see AWS documentation).
Use these commands on your own risk. Understand the function of the commands and the related risks before you apply them.
All commands require root privileges which can be obtained through the sudo command.
Create a root Password
$ passwd root <the password>
Configure and Restart the ssh Service for root Access
Edit the configuration file /etc/ssh/sshd_config. Change the following to parameter to the values shown below:
PermitRootLogin yes
PasswordAuthentication yes
Restart the service with the command
$ service sshd reload
Patch the authorized Keys File for the root User
The simplest way is to use the ec2-user file and the certificate for the root user. Copy the ec2-user file over to the root user:
$ cp ~ec2-user/.ssh/authorized_keys ~root/.ssh/authorized_keys
This allows as well to login with the same key which is available for the ec2-user.
Update the AWS Cloud Configuration File
Edit the file /etc/cloud/cloud.cfg and change the following entry to this value:
disable_root false
- 73499 views
Important addition to this article
in /etc/cloud/cloud must set ssh_pwauth to true, otherwise, after reboot , or launch of EC2 from an AMI - root will fail to connect via SSH.
- Log in to post comments
Installation of a Graphical Desktop with RDP Access for SUSE SLES 11, 12, 15 or Ubuntu
Installation of a Graphical Desktop with RDP Access for SUSE SLES 11, 12, 15 or UbuntuSome installations may require graphical tools to be operated on the target server.
Important dependencies
- xrdp uses vnc
- vnc uses X11 and window managers
Software Installation
AWS installations come by default without a GNOME desktop environment. The following commands will install a GNOME desktop and an xrdp service to connect to the systems:
SLES 11 & 12
$ sudo zypper install -t pattern gnome-basic
SLES 15
Use yast and the install pattern "Gnome basic"
- $ sudo yast
- Select "Software", enter "tab"
- Select "Software Management", enter "cr"
- Move active field to "Filter Search", enter "Shift"+"tab"
- Use down keyboard key to unfold selection list
- Select "Patterns"
- Select "GNOME Desktop Environment (Basic)"
- Select "Accept"
Ubuntu
$ sudo apt update
$ sudo apt install ubuntu-desktop
Install xRDP
SUSE
$ sudo zypper install xrdp
UBUNTU
sudo apt install xrdp
sudo systemctl status xrdp
# Output
# xrdp.service - xrdp daemon...
sudo adduser xrdp ssl-cert
sudo systemctl restart xrdp
Enable VNC Remote Login
SUSE
- $ sudo yast
- Select " Network Services"
- Select first entry "Remote Administration with VNC"
- Enable service
SUSE: Configure Window Manager to use Gnome
- Edit file /etc/sysconfig/windowmanager
- Change entry DEFAULT_WM="" to DEFAULT_WM="gnome"
Ubuntu: Configure PolKit-Framework
sudo bash -c "cat >/etc/polkit-1/localauthority/50-local.d/45-allow.colord.pkla" <<EOF
[Allow Colord all Users]
Identity=unix-user:*
Action=org.freedesktop.color-manager.create-device;org.freedesktop.color-manager.create-profile;org.freedesktop.color-manager.delete-device;org.freedesktop.color-manager.delete-profile;org.freedesktop.color-manager.modify-device;org.freedesktop.color-manager.modify-profile
ResultAny=no
ResultInactive=no
ResultActive=yes
EOF
Startup the RDP service and make it start automatically after Reboot
These commands need to be executed with the sudo command from the ec2-user.
SLES 11
# service xrdp start
# chkconfig --set xrdp on
SLES 12 & 15, Ubuntu
# sudo systemctl start xrdp
# sudo systemctl enable xrdp
- 77786 views
software installation
I try this command it's nort answer.
But i try this : zypper install -t pattern gnome
it works!!!
thanks to make correction for SLES 15
- Log in to post comments
SLES15 GNOME
Please add steps to install GNOME on SLES15:
1. Activate "Desktop Applications Module 15 SP3 x86_64"
2. sudo zypper in -t pattern gnome_basic
- Log in to post comments
Register a Subscription in SLES ( and keep AWS CLI working!)
Register a Subscription in SLES ( and keep AWS CLI working!)SLES 12 & 15
Use this command to register your system at SUSE.
# SUSEConnect -r <YourActivationCode> -e <YourEmailAddress>
More details can be found in the SUSE documentation.
SUSE BYOS AMIs on AWS do not tend to update their cloud module. Execute the following commands as super user to get this done:
SLES 12
# SUSEConnect --list-extensions
# SUSEConnect -p sle-module-public-cloud/12/x86_64
SLES 15
# SUSEConnect --list-extensions
# SUSEConnect -p sle-module-public-cloud/15/x86_64
The AWS CLI is an important part of this module. Updating it will allow you to use the latest services and new regions. Don't forget updating your packages with
# zypper update
| Important |
|---|
|
The AWS CLI will not work by default on SLES 15! The required patch for boto will only be installed if this repository is configured. |
- 10840 views
Registering Repositories for AWS SuSE AMIs
Registering Repositories for AWS SuSE AMIsSuSE SLES 11 and 12 AMIs use AWS specific repositories to install and update packages.
There are situations when SuSE systems aren't able to install new packages or update them because they lost their AWS repository configuration.
This problem can be fixed by issuing the following command as super user:
/usr/sbin/registercloudguest --force-new
Disclaimer: This command will perform major changes to your system. Handle it with care and consult the SuSE documentation upfront!
- 8149 views