Building a Private Virtual Network (PVN) with Solaris Zones
Building a Private Virtual Network (PVN) with Solaris ZonesThis page describes step by step how to build a private virtual network with Solaris 11 zones.
Solaris 11 zones which operate in a private virtual network have the following advantage
- They allow to quickly configure complex distributed applications in a private network
- The network and the zones are completely hidden inside a Solaris 11 system
- No coordination with network administration in regards of IP addresses, router configurations etc. is needed
The required resources are
- an Oracle Solaris 11 server without sufficient memory, disk and CPU resources to operate the applications needed. The zones overhead will be most likely not relevant
- root privileges to your Oracle Solaris 11 server
- an IPS server in the network of your Oracle Solaris 11 server. It will be needed to install zones on the fly
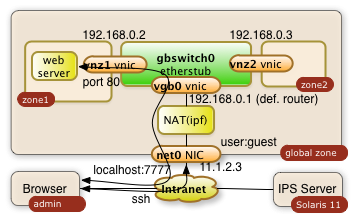
This step-by-step tutorial will show how to configure an internal network with zones as shown in the diagram below:
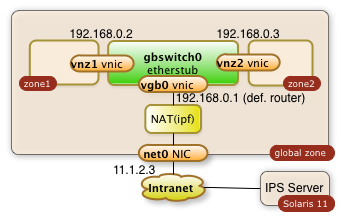
You will learn how to...
- create a virtual switch (gbswitch0) inside your Oracle Solaris 11 servers
- virtual network interfaces (vgb0, vnz1, vnz2) which will be attached to the virtual switch
- create zones which will use the virtual switch
- configure the routing to keep all communication inside your Oracle Solaris server
- configure a network address translation (NAT) which allow your internal zones to access external services like DNS
- configure a reverse proxy for the public network interface. This reverse proxy will allow to access internal web applications through the already existing public network interface
- access your internal zones through the intranet with ssh tunneling through the public IP address
To summarize it: This is your personal private lab in a box. Some call it a cloud.
All required operations can be performed with a few scripts as root from the global zone. There are no extra licenses required to operate your cloud in a box...
References:
- Oracle Documentation Planning and Designing a virtual network
- Nicholas Droux' Blog: Private virtual networks for Solaris xVM and Zones with Crossbow
The three sections of the how-to guide:
- 8528 views
Preparation and Configuration of the global Zone
Preparation and Configuration of the global ZoneDisclaimer: All commands executed need root privileges and they make major changes to your system. Have a backup or a boot environment before you start experimenting.
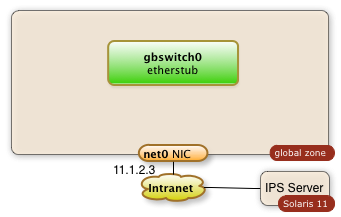
1. Create a virtual Switch
The command:
$ dladm create-etherstub gbswitch0
Will create an internal virtual switch as shown in the diagram below:
You can control the success of this operation with the command
$ dladm show-etherstub
LINK
gbswitch0
The swith can de deleted with the command
$ dladm delete-etherstub gbswitch0
This virtual switch will be needed to operate our internal network.
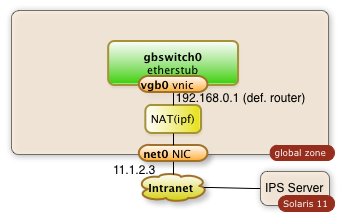
2. Create a virtual Network Interface which connects the global Zone to the virtual Switch
The sequence of commands below will create a virtual network interface for the switch.
The idea is to operate an internal network in the IP range 192.168.0.0.
The name of the virtual network interface is vgb0. The IP address is 192.168.0.1
$ dladm create-vnic -l gbswitch0 vgb0
$ ipadm create-ip vgb0
$ ipadm create-addr -T static -a 192.168.0.1/24 vgb0/addr0
This result will be a Solaris global zone with a second network interface which isn't visible to the outside (the intranet):

The successful creation of a vnic (virtual network address) can be checked with the following command.
$ dladm show-vnic
LINK                OVER         SPEED  MACADDRESS        MACADDRTYPE       VID
vgb0                gbswitch0    40000  2:8:20:51:c8:5f   random            0
and
$ ipadm show-addr vgb0
ADDROBJ           TYPE     STATE        ADDR
vgb0/addr0        static   ok           192.168.0.1/24
You may need to delete the vnic. This can be achieved through the command:
$ dladm delete-vnic vgb0
3. Enable the IP Forwarding
I assume that the current system has a public network interface with the name net0. I assumeas well that this is the only network interface. IP-forwarding is most likely disabled in this case. It needs to be enabled. The following command enables the IP forwarding through the interfaces net0 and vgb0:
$ ipadm set-ifprop -p forwarding=on -m ipv4 net0
$ ipadm set-ifprop -p forwarding=on -m ipv4 vgb0
The IP-forwarding can be disable after the private virtual network isn't needed anymore. This happens with the following commands:
$ ipadm set-ifprop -p forwarding=on -m ipv4 net0
$ ipadm set-ifprop -p forwarding=on -m ipv4 vgb0
4. Enable the Network Address Translation
The zones which will work through the private virtual network will find their way out of the system as well without NAT. The problem arises for IP packets on their back. Systems outside of the PVN will not know about this sub-net and they will not have routes to communicate back. The public interface of the global zone has to act as a proxy and it will have to know how to relay packets back. This is being done by the ipfilter service which is disabled by default.
The Network Address Translation is a service which needs to be configured first by creating the file /etc/ipf/ipnat.conf. The commands below enable the network address translation for the internal network 192.168.0.0.
$ echo "map $MyPublicNic 192.168.0.0/24 -> 0/32  portmap tcp/udp auto" > /etc/ipf/ipnat.conf
$ echo "map $MyPublicNic 192.168.0.0/24 -> 0/32" >> /etc/ipf/ipnat.conf
The last step is to start the ipfilter service
$ svcadm enable network/ipfilter
The diagram below demonstrates the configured components:
There are chances that you will have to stop the ipfilter service one day. The service can be stopped with this command:
$ svcadm disable network/ipfilter
5. Scripts
Enjoy the two scripts. Use them with caution.
5.1 Preparation of the global Zone
Change the variables at the beginning as needed.
The script will not check if certain files already exist nor if required services are already running and network objects already exist!
#!/bin/bashMySwitch=gbswitch0
MyRootZoneNic=vgb0
MyRootZoneIp=192.168.0.1
MyInternalNet=192.168.0.0
MyPublicNic=net0echo "** create a switch with name $MySwitch "
dladm create-etherstub $MySwitch
echo "*  create a vnic with name $MyRootZoneNic "
dladm create-vnic -l $MySwitch $MyRootZoneNic
echo "*  create ip for $MyRootZoneNic"
ipadm create-ip $MyRootZoneNic
echo "*  create ip addr $MyRootZoneIp for $MyRootZoneNic"
ipadm create-addr -T static -a $MyRootZoneIp/24 $MyRootZoneNic/addr0
#echo "* enable ipv4 forwarding in root zone "
#routeadm -u -e ipv4-forwarding
echo "*  Status check network plumbing:"
dladm show-vnic
echo "** create NAT configuration with ipf, enable forwarding"
ipadm set-ifprop -p forwarding=on -m ipv4 $MyPublicNic
ipadm set-ifprop -p forwarding=on -m ipv4 $MyRootZoneNic
cp /etc/ipf/ipnat.conf /etc/ipf/ipnat.conf.orig
echo "map $MyPublicNic $MyInternalNet/24 -> 0/32  portmap tcp/udp auto" > /etc/ipf/ipnat.conf
echo "map $MyPublicNic $MyInternalNet/24 -> 0/32" >> /etc/ipf/ipnat.conf
svcadm enable network/ipfilter
5.2 Cleanup, undo, deletion
This script will swipe out the configuration which has been configured. It's simple and brutal...
#!/bin/bashMySwitch=gbswitch0
MyRootZoneNic=vgb0
MyRootZoneIp=192.168.0.1
MyPublicNic=net0echo "* disable ipv4 forwarding in root zone"
routeadm -u -d ipv4-forwarding
echo "*   delete addr: $MyRootZoneNic"
ipadm delete-addr $MyRootZoneNic/addr0
ipadm delete-ip $MyRootZoneNic
echo "*   delete vnic: $MyRootZoneNic"
dladm show-vnic
dladm delete-vnic $MyRootZoneNic
dladm show-vnic
echo "*  delete a switch with name $MySwitch "
dladm show-etherstub
dladm delete-etherstub $MySwitch
dladm show-etherstub
echo "** delete NAT configuration with ipf"
ipadm set-ifprop -p forwarding=off -m ipv4 $MyPublicNic
ipadm set-ifprop -p forwarding=off -m ipv4 $MyRootZoneNic
svcadm disable network/ipfilter
- 5690 views
Creating and Configuring the Zones
Creating and Configuring the ZonesI expect the virtual switch and the global zone configuration steps already being solved at this point of time. See below:
This means that a virtual switch with the name gbswitch0 already exists.
A bit of planning is required in order to have all data for configure the zone. The following information is needed. The names which I'm going to use in my commands are already entered:
| Information | optional | Value |
|---|---|---|
| zone name | mandatory | zone1 |
| zones home directory | mandatory | /zones |
| zone virtual network interface | mandatory | vnz1 |
| ip address in private network | mandatory | 192.168.0.2 |
| default router for private network | mandatory | 192.168.0.1 |
| IP address of DNS server | optional | |
| root password | mandatory | |
| user name, full user name, user password | optional | |
| time zone information | optional |
1. Create a Virtual Network Interface for the Zones
The zone will have one interface. The interface will be virtual network interface vnz1 which will be attached to the virtual switch gbswitch0 The following commands will have to be executed in the global zone:
dladm create-vnic -l gbswitch0 vnz1
2. Declare the Zone
The commands below will configure a zone with the name zone1 and a network interface vnz1
$ zonecfg -z zone1 "create; set zonepath=/zones/zone1;set ip-type=exclusive; commit"
$ zoneadm -z zone1 install
$ zonecfg -z zone1 "add net; set physical=vnz1;end"
3. Boot and Configure the Zone
The zone is now ready to be booted:
zoneadm -z zone1 boot
The zone is now running. The network configuration isn't complete and it takes a login through the zones console with a sys-config dialog. Enter
$ zlogin -C zone1
This will lead you into a sysconfig dialog. Choose a manual network configuration and provide the remaining information from the table above and configure the IP address and the default router. The configuration of name services and NIS is optional.
The zone should be ready for usage after these steps.
The zone is
- ready for additional software installation
- the zone can reach any other zone in the private virtual network
- the zone can reach out to the intranet when needed through the NAT services of the global zone
The zone is otherwise private for the outside intranet.
Repeat the same steps for a second zone and you end up with a private virtual network with multiple zones.
4. Scripts
4.1 Zone Configuration and installation
#!/bin/bashMySwitch=gbswitch0
MyZoneNic=vnz1
MyZone=zone1
MyZoneIp=192.168.0.2
MyRootZoneIp=192.168.0.1echo "** create VNIC $MyZoneNic in global zone"
# Configure and install the zone zonecfg -z $MyZone "create; set zonepath=/zones/$MyZone;set ip-type=exclusive; com
dladm create-vnic -l $MySwitch $MyZoneNic
echo "** starting creation of zone: $MyZone"
mit"
zoneadm -z $MyZone verify
zoneadm -z $MyZone install
zonecfg -z $MyZone "add net; set physical=$MyZoneNic;end"
echo "** Booting zone $MyZone "
zoneadm -z $MyZone boot
echo "** sleep for 30 seconds and hope for the zone to come for post config "
sleep 30
zoneadm list -v
Kick off the sys-config by logging into the zlogin
$ zlogin -C zone1
4.2 Deletion of the Zone
This script is a kind of brutal. It wipes out the entire zone...
#!/bin/bashMyZoneNic=vnz1
MyZoneIp=192.168.0.2
MyZone=zone1zoneadm list -v
zoneadm -z $MyZone halt
zoneadm -z $MyZone uninstall -F
zonecfg -z $MyZone delete -F
zoneadm list -v
dladm show-vnic
dladm delete-vnic $MyZoneNic
dladm show-vnic
- 4722 views
Accessing the Private Virtual Network
Accessing the Private Virtual NetworkAccessing the private virtual network is no different to access any lab network through a gate way system
1. Accessing internal Web Servers with an Apache Reverse Proxy Server Configuration
The global zone can be configured to run an Apache web server as reverse proxy. This allows to direct a browser to web port of the global zone public network interface and work with a specific web server of the internal private virtual network.
The following example assumes that zone1 offers a http service through port 80 at the internal IP address 192.168.0.2.
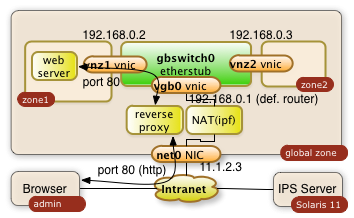
It will be made available to 11.1.2.3
1.1. Configure configuration file of Apache 2.2 in global zone
The proxy server gets configured through the httpd.conf file with the following directives:
/etc/apache2/2.2/httpd.conf:
|
... ServerName myglobalZone.public.name.com ... ProxyRequests Off ProxyPass / http://192.168.0.2/ ProxyPassReverse / http://192.168.0.2/ ... |
The three directives avoid that the Apache server acts as a regular proxy (ProxyRequests Off). The ProxyPass and ProxyPassReverse directives teach the server to relay all http requests ( / ) to 192.168.0.2/ and the responses back. The ending slashes matter!
1.2. Start the Apache Server in the global zone
Start or restart the server with the following priviledged Solaris command in the global zone:
$ svcadm restart svc:/network/http:apache22
The svcadm command starts the Apache server on Solaris as a service. This command assures that the service is up even after a reboot of the system. This is all it takes on the proxy side!
This setup of the reverse proxy does the job for pretty much every simple web server behind it.
Warning: The web server in the private network may have to know that it's http service is getting exposed by a reverse proxy. Some web applications generate URLs on the fly. This post configuration is however completly application specific
2. ssh Tunnels
A more ad-hoc and very safe way to access a port in your private virtual network is a ssh tunnel.
The user on system admin will need an account in the global zone of the Solaris 11 system (IP address: 11.1.2.3). The account name being used in this example is guest.
ssh tunnels allow to plumb a port of a remote system to your local system. The following command will plumb the port 80 of zone1 to port 7777 of the desktop the user admin is using:
$ ssh -L 7777:192.168.0.2:80 guest@11.1.2.3
The command will lead to a shell session of user guest in the global zone. Besides this you will get the tunnel to be established. The user on system admin can now direct a browser to http://localhost:7777 a use the web server from zone1. The diagram below shows the interactions of the three systems.
The -L can be used multiple times in a single command. It'll tunnel any number of ports needed.
References
- 4053 views